Tools I built for my project “TWIN FLAMES”.
Introduction
Video games have changed my life. Since childhood, I have loved playing video games. Now, I can't believe that I am making video games for a living. For me, creating video games feels like constructing a virtual world. We build these worlds and set up rules to play within them. The joy of watching someone play in the world you've created is truly priceless.
For quite some time, I've been working on a turn-based puzzle adventure game set on a hex grid in Unity. It’s called “TWIN FLAMES”. In this game, players control two characters: Savitri and Satyavan. Their goal is to reach a destination tile while avoiding obstacles and ensuring that each character has a viable path to get there. The hexagonal grid adds an interesting twist to the gameplay, allowing for strategic movement and unique challenges.
Just so you know, I come from a biology background with a focus on biotechnology. However, my passion lies in creating virtual worlds. Video games serve as the basic building blocks for these digital realms. After completing my graduation, I decided to explore game development. My research led me to discover that existing game engines could help me achieve my goal. Among these options, Unity stood out due to its user-friendly interface and robust programming capabilities with C# made it an excellent starting point for my journey into game development.
As a developer, I've had the opportunity to explore different mechanics and experiment with various tools. From designing the characters to creating intricate level layouts, every aspect of this project has been both challenging and rewarding.
Hierarchy Icons
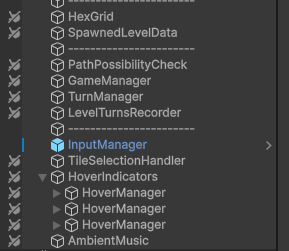
Have you ever experienced the clutter of hierarchy in game development? The more game objects you add, the more organized it should be. However, finding a specific component to modify its values can take up to 5 to 10 seconds. This might seem trivial, but when repeated 100 times, it can add up to more than 15 minutes. To reduce this, I found a solution: displaying component icons in the hierarchy.
While there are free packages available in the asset store, I wanted to create my own solution as I enjoy customizing Unity’s default UI.
For every script I create, I add an icon to it.
Wrote a script that listens to EditorApplication.hierarchyWindowItemOnGUI, which is called for each game object in the hierarchy.
Implemented a method that reads the Hierarchy window Item Instance Id, converts it to a game object, collects all components, retrieves its icon (including default icons), and creates an Icon.
This approach significantly improved the efficiency of navigating through the hierarchy of game objects to find specific components.

Hierarchy Icons Code
[InitializeOnLoad]
public class HierarchyIcons
{
// This class is used to customize the Unity Editor's hierarchy window by adding icons to GameObjects based on their components.
static HierarchyIcons()
{
// Here, we subscribe to the hierarchyWindowItemOnGUI event, which allows us to customize the display of hierarchy items.
EditorApplication.hierarchyWindowItemOnGUI += HierarchyItemCB;
}
private static void HierarchyItemCB(int instanceID, Rect selectionRect)
{
// This method is called for each hierarchy item (GameObject) in the hierarchy window.
// It receives the instance ID of the GameObject and the selectionRect (the position of the item in the hierarchy).
UnityEngine.Object Object = EditorUtility.InstanceIDToObject(instanceID);
if (Object != null)
{
// Convert the instance ID to a GameObject.
GameObject gameObject = (GameObject)Object;
Component[] components = gameObject.GetComponents<Component>();
for (int i = 0; i < components.Length; i++)
{
Component component = components[i];
if (component is Transform) continue;
// Get the icon associated with the component's type.
Texture icon = EditorGUIUtility.ObjectContent(null, component.GetType()).image;
// Avoid default script icon
if (icon != null && icon.name != "d_cs Script Icon")
{
// Create GUIContent with the icon and adjust the position to display it in the hierarchy.
GUIContent gUIContent = new GUIContent(icon);
selectionRect.xMin = selectionRect.xMax - ((i) * 20);
GUI.Label(selectionRect, gUIContent);
}
}
}
}
}
Scene View Overlays
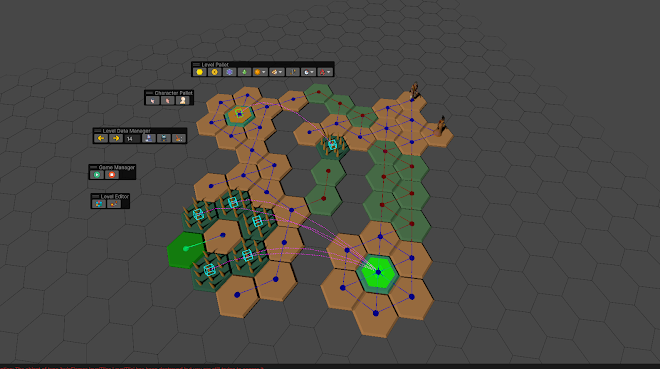
Since Twin Flames is a puzzle game, it requires well-structured levels. During the development process, I needed efficient tools that would allow me to create, edit, save, and load these levels seamlessly.
My initial thought was to build a custom editor, but then I recalled watching Unity's New Contextual Workflows for Faster Prototyping session from Siggraph 2021. The concept of Scene View Overlays caught my attention. These overlays can be freely moved and docked to the edges of the scene view. It struck me that if I could implement them correctly for my level editor, I could perform all the necessary editing directly within the scene view.
As I progressed, I managed to make the entire level editor playable within the scene view itself, bypassing the runtime loop entirely. The key components were simple buttons, each button triggering a specific action. To achieve this, I extended the `EditorToolbarButton` class to create overlay buttons and further extended `ToolbarOverlay` to organize and manage these buttons effectively.
ToolBarButton Extension class Example
[EditorToolbarElement(id, typeof(SceneView))]
internal class Savitri : EditorToolbarButton
{
// Load the icon for Savitri
public const string id = "LevelEditor/Savitri";
private LevelEditor LevelEditor;
public Savitri()
{
// Load the icon texture
icon = AssetDatabase.LoadAssetAtPath<Texture2D>("Assets/Editor Default Resources/Characters/Icon_Savitri.png");
// Set tooltip for the button
tooltip = "Savitri";
// Attach a click event handler
clicked += OnClick;
}
private void OnClick()
{
// Click functionality
}
}
ToolBarOverlay Extension class example
[Overlay(typeof(SceneView), "Character Pallet")]
public class CharacterPallet : ToolbarOverlay
{
private CharacterPallet() : base(
Savitri.id,
Satyavan.id
)
{ }
}
Toolbar Buttons
Believe it or not, the scope I set for the twin flames is not small. Especially for a solo dev. It’s a 3D puzzle adventure. For some reason, my brain thought, "Let's make each level a scene and create complete 3D art for each one." I know the atrocity of my brain. The scope is now beyond my control.
Still, I wanted to take the chance. So, I tested the time it takes to create a single-level environment for a couple of levels. Then I realized that it did not take more than 2 days for the first scene and 1 day for another 2 levels, only if I have the final concept art for the environment. Of course, it's not full-scale AAA style but low-poly vertex color with lighting and effects. Believe it or not, post-process effects increased the low-poly art aesthetics to the next level. Hats off to depth of field.
The issue is that there will be more than 50 levels, and I need appropriate tools to load specific levels with art. That’s where the Toolbar Buttons come into play.
I found this Extend the Unity Toolbar with your own Editor UI code on github.
All I have to do is Create a method which draws a button using Editor UI and add that method to the toolbar extender Action list.
Like this
ToolbarExtender.LeftToolbarGUI.Add(LevelEditorButtonsAsync);
ToolbarExtender.RightToolbarGUI.Add(LevelButtons);
I’ve developed additional tools for the Twin Flame project. Among them, the plant creator tool stands out as one of the best. However, the ones mentioned above are the most practical and I use them on a daily basis.


Comments
Post a Comment